Google Pay Settings
Google Pay provides customers with a fast, secure checkout experience using payment methods they've already stored in their Google account. These settings control how Google Pay appears and functions on your WooCommerce store, from button styling to transaction processing behavior.
With PayPal's Google Pay integration, you don't need to go through any approval process with the Google API team. PayPal provides your merchant ID information automatically, so you can start accepting Google Pay payments as soon as you enable it.
Enabled
Controls whether Google Pay is available as a payment option on your site. When disabled, the Google Pay button will not appear anywhere on your store, even if other settings are configured.
Before enabling Google Pay in the plugin, you need to enable it in your PayPal Developer Console. Navigate to developer.paypal.com, go to Apps & Credentials, click on your app, and scroll to the Features section. Make sure Google Pay is enabled:
Once Google Pay is enabled in both your PayPal app and this plugin setting, the Google Pay button will appear in the sections you've configured.
Default: Disabled
Title
The name customers see for this payment method during checkout. This text appears in the list of available payment options when customers are ready to complete their purchase.
While "Google Pay" is the default, you might customize this to match your store's language or branding. For example, a store targeting a specific region might use localized terminology that resonates better with their customer base.
Default: Google Pay
Description
Optional text that appears below the payment method title when customers select Google Pay at checkout. This space can be used to provide additional context or reassurance about the payment process.
Common uses include explaining what Google Pay is for customers who may not be familiar with it, highlighting security features, or noting any specific requirements like minimum order amounts.
Default: Empty (no description shown)
Transaction Type
Determines whether payments are immediately captured or only authorized when customers complete their purchase. This fundamental setting affects your cash flow and order fulfillment workflow.
Capture collects payment immediately during checkout. The funds are transferred from the customer's account right away, and the order can be fulfilled without additional steps. This is the standard approach for most online retailers selling readily available products.
Authorize places a hold on the customer's funds without actually charging them. The payment must be manually captured later from the WooCommerce order page. This approach is valuable when you need time between receiving the order and fulfilling it, such as for custom products, pre-orders, or items requiring additional verification.
Authorized charges can be captured on the Admin Order page. Keep in mind that PayPal authorizations are valid for up to 29 days, after which they expire and cannot be captured.
Default: Capture
Authorized Order Status
When you authorize rather than capture payments, this setting determines what order status is assigned after the customer completes checkout. The order status helps you track which orders are awaiting fulfillment and payment capture.
On Hold (the default) is typically the most appropriate status for authorized payments. It clearly indicates that the order is waiting for some action—in this case, payment capture—before proceeding to fulfillment. You can change this to another status if your workflow requires it, such as Processing if your team handles authorized payments as part of their normal fulfillment process.
This setting only appears and applies when Transaction Type is set to Authorize.
Default: On Hold
Button Text
Customizes the text that appears on the Place Order button when Google Pay is selected as the payment method. This allows you to create a more cohesive checkout experience or provide clearer instructions to customers.
For example, you might change it to "Pay with Google Pay" or "Complete Google Pay Order" to be more explicit about the action being taken. When left blank, WooCommerce's default Place Order text is used.
Default: Empty (uses WooCommerce default)
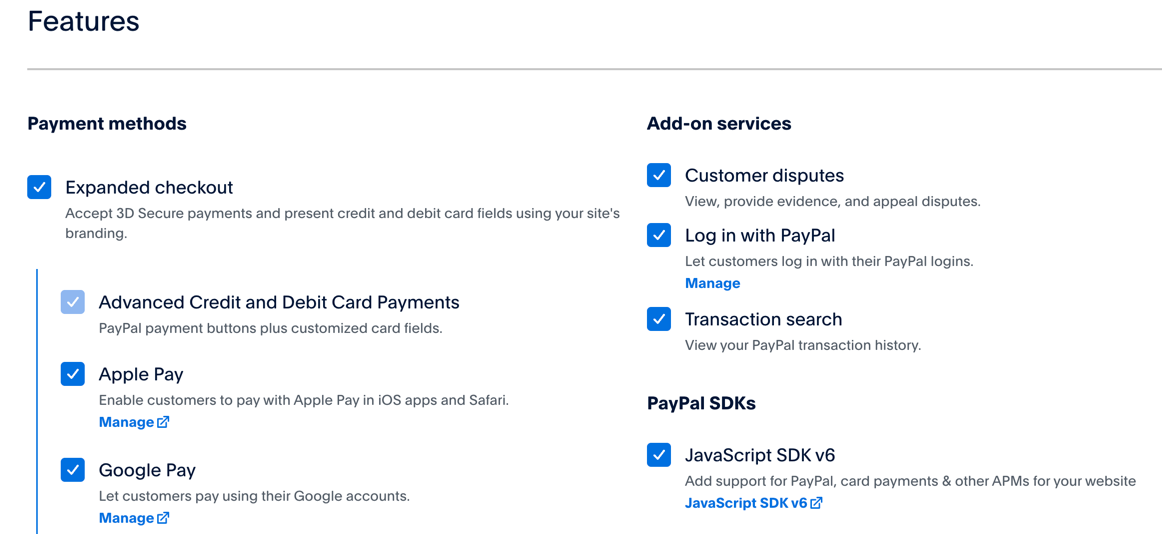
Google Pay Payment Sections
Specifies where the Google Pay button appears throughout your store. Google Pay works as both a traditional checkout payment method and an express checkout option, allowing customers to bypass the standard checkout process entirely.
Multiple sections can be selected to give customers convenient access to Google Pay wherever they are in the shopping journey:
- Checkout Page - Appears among other payment methods during the standard checkout process
- Product Page - Allows customers to purchase immediately from individual product pages
- Cart Page - Provides a quick way to checkout from the cart without going through the full checkout form
- Minicart - Appears in the sliding cart widget that many themes use
- Express Checkout - Shows in express checkout sections, typically at the top of the checkout page
- Order Pay - Appears on the order payment page for pending orders
Default: Cart Page, Checkout Page, Order Pay
Payment Method Format
Controls how saved Google Pay payment methods are displayed to customers when they return to your store. This setting affects the appearance of payment methods in the customer's account area and during checkout if they've saved their Google Pay information.
Different formats emphasize different aspects of the payment method. "Type ending in..." shows the card type and last four digits (e.g., "Visa ending in 1234"), while other formats might emphasize the payment provider or account details.
Default: Type ending in (shows card brand and last four digits)
Checkout Page Button Placement
Determines where the Google Pay button is positioned on the checkout page. This placement affects how customers encounter and interact with the Google Pay option during checkout.
Place Order Button renders the Google Pay button in the same location as the standard Place Order button. When customers select Google Pay as their payment method, the button adapts to process the Google Pay payment. This creates a streamlined experience where the action button changes based on the selected payment method.
In payment gateway section places the Google Pay button directly within the payment method selection area, below the Google Pay radio button. This creates a more distinct visual separation between selecting the payment method and completing the purchase.
Default: Place Order Button
Screenshot showing the place order button location.

Screenshot showing the GPay button in the payment method section.
Icon
The icon style that appears next to Google Pay in the payment method list on the checkout page. Google provides specific branding guidelines for their payment button, and these options comply with those requirements while giving you flexibility in presentation.
- With Rounded Outline - The Google Pay logo enclosed in a rounded rectangle border
- With Outline - The Google Pay logo with a standard rectangular border
- Standard - The Google Pay logo without any border
The icon appears alongside the payment method title, helping customers quickly identify the Google Pay option among other payment methods.
Default: With Rounded Outline
Enable 3DS
Controls whether 3D Secure authentication is used for Google Pay transactions. 3D Secure adds an extra layer of security by requiring customers to verify their identity with their card issuer during checkout.
When enabled, 3DS is automatically triggered when required by the card issuer or when risk factors suggest additional verification would be beneficial. This helps protect your business from fraudulent transactions while ensuring a smooth checkout experience for legitimate customers.
Disabling this setting means 3DS will never be used, even when it would otherwise be required or recommended.
Default: Enabled
Force 3DS
Requires 3D Secure authentication for every transaction where it's supported, regardless of risk level or card issuer requirements. While this provides maximum security, it adds friction to the checkout process since customers must complete additional verification steps.
This setting is most appropriate for merchants selling high-value items, operating in industries with elevated fraud risk, or dealing with chargebacks frequently enough that the added security outweighs the potential impact on conversion rates.
Force 3DS only appears and functions when Enable 3DS is turned on.
Default: Disabled
Button Color
Sets the background color of the Google Pay button throughout your store. Google provides three approved color options that work with their brand guidelines while allowing you to match your store's design.
- Default - Google's standard multi-color button that works well on most backgrounds
- Black - A black button that provides strong contrast on light backgrounds
- White - A white button suitable for dark backgrounds or themes
The button color applies to all instances of the Google Pay button across your site, from product pages to checkout.
Default: Default (multi-color)
Button Type
Determines the text that appears on the Google Pay button. Different button types communicate different actions, allowing you to match the button's message to its context.
- Buy - General purpose for product purchases
- Plain - Shows only the Google Pay logo without action text
- Checkout - Emphasizes proceeding to checkout
- Order - Focuses on placing an order
- Pay - Simple and direct payment action
- Donate - For charitable or donation transactions
- Book - Suitable for reservations and bookings
- Subscribe - For subscription-based products or services
Choose the button type that best matches how customers think about the action they're taking. For example, "Subscribe" makes sense for membership sites, while "Buy" works well for standard product purchases.
Default: Buy
Button Border Type
Controls whether the Google Pay button includes a visible border around it. This subtle styling option can help the button stand out or blend in depending on your design needs.
- No Border - A flat button without any border, creating a cleaner look
- Border - Includes a border around the button for additional definition
The border style interacts with your button color choice. For example, a white button with a border provides clear definition on light backgrounds, while a black button without a border might work better for minimalist designs.
Default: Border
Button Size Mode
Determines how the Google Pay button adapts to its container space. This setting affects the button's behavior across different pages and screen sizes.
Static creates buttons with a fixed width and height regardless of the available space. This ensures visual consistency but might not work well on all screen sizes or page layouts.
Fill makes the button expand to use the full width of its container. This creates a more responsive design that adapts to different screen sizes and fits naturally within your store's layout, particularly on mobile devices.
Default: Fill
Button Radius
Controls the roundness of the Google Pay button's corners, measured in pixels. A higher number creates more rounded corners, while zero creates sharp, square corners.
This setting allows you to match the button's appearance to your store's overall design language. If your site uses rounded buttons throughout, you can apply similar rounding to the Google Pay button. If your design is more angular, you can reduce or eliminate the border radius.
The value must be a non-negative integer (whole number). Common values range from 0 (square corners) to 25 or more (very rounded corners).
Default: 4 pixels