Installation
Getting the PayPal plugin installed on your WordPress site is the first step toward accepting payments from customers around the world. This straightforward process takes just a few minutes and requires no technical expertise.
What You Need Before Starting
Before installing the PayPal plugin, ensure your WordPress site already has WooCommerce installed and activated. The Payment Plugins for PayPal WooCommerce plugin is designed specifically to work with WooCommerce, and you'll see a helpful notification during installation if WooCommerce isn't detected on your site.
Your WordPress site should be running a compatible version of WordPress, and you'll need administrator access to install plugins. The plugin works with over 90,000 active installations, so compatibility issues are rare.
How Do I Install the PayPal Plugin from WordPress?
Installing the plugin directly from your WordPress dashboard is the most straightforward method. Navigate to your WordPress Admin area and locate the Plugins section in the left sidebar. Click on Plugins to expand the menu, then select Add New.
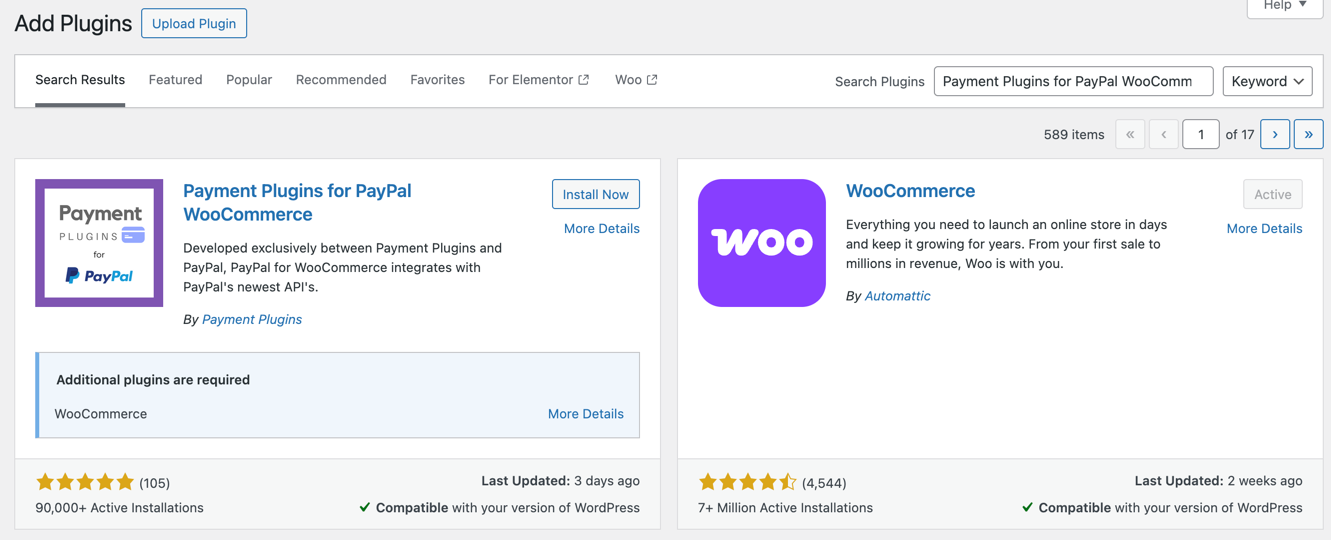
Once you're on the plugin installation page, you'll see a search field in the upper right corner. Type "Payment Plugins for PayPal WooCommerce" into this search field. The plugin should appear as the first result, displaying the familiar PayPal logo and showing its impressive 4.8-star rating from thousands of users.

The PayPal plugin appears at the top of search results with its distinctive blue PayPal logo and high rating
Click the Install Now button next to the plugin listing. WordPress will automatically download and install the plugin files to your server. This process typically takes just a few seconds, depending on your internet connection speed.
Activating Your New PayPal Plugin
After installation completes, the Install Now button transforms into an Activate button. Click Activate to enable the plugin on your site. You'll know activation was successful when you see a confirmation message at the top of your plugins page.
The plugin is now installed and ready for configuration, but it won't start processing payments until you complete the setup process. Think of activation as unlocking the plugin's features rather than making it immediately functional.
Where to Find Your Plugin Settings
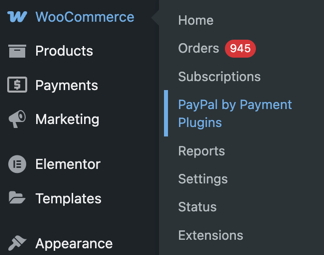
Once activated, you can access all PayPal plugin settings through the WooCommerce menu in your WordPress admin. Look for the WooCommerce section in your left sidebar, and you'll find a new submenu item called PayPal by Payment Plugins.

After activation, the PayPal plugin settings appear in the WooCommerce menu as "PayPal by Payment Plugins"
This dedicated settings area is where you'll configure your PayPal connection, set up payment methods, and customize how payments appear to your customers. The plugin integrates seamlessly with WooCommerce's existing interface, so managing PayPal settings feels natural within your familiar WordPress environment.
What Happens Next?
With the plugin successfully installed and activated, you're ready to begin the setup process. The next step involves connecting your PayPal account to the plugin, which requires creating API credentials in your PayPal developer account.
The plugin includes helpful setup wizards and clear instructions to guide you through each configuration step. Most merchants can complete the entire setup process in under 15 minutes, from installation to accepting their first PayPal payment.