Settings
The Apple Pay settings page controls how Apple Pay appears and functions on your WooCommerce store. These settings determine everything from where the Apple Pay button displays to how transactions are processed. You'll configure domain verification, button appearance, payment processing behavior, and security options to match your business needs.
Domain Association File
Apple Pay requires a domain association file to verify your domain ownership. Click the Add domain association file button to automatically add the apple-developer-merchantid-domain-association file to the .well-known directory in your site's root folder. This file must be present for Apple Pay to function properly.
Without this file, Apple Pay will not work on your site. The plugin handles the file creation and placement automatically, but you need to click the button to initiate the process. If you move your site or change domains, you'll need to add the domain association file again for the new domain.
Default: Not applicable (action button)
If the upload of the domain association file fails you will need to manually add the file to your webserver's root directory.
Enabled
Enable this option to offer Apple Pay on your site. When enabled, customers using Safari or other Apple Pay-compatible browsers will see the Apple Pay button in the locations you've configured.
Before enabling Apple Pay in the plugin, you need to enable it in your PayPal Developer Console. Navigate to developer.paypal.com, go to Apps & Credentials, click on your app, and scroll to the Features section. Make sure Apple Pay is enabled:
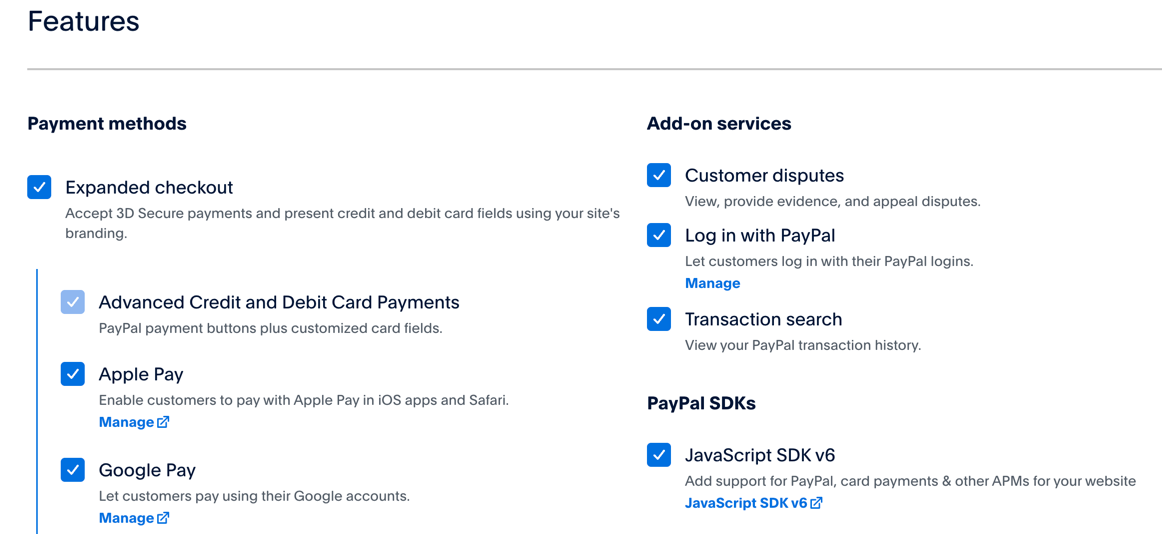
Once Apple Pay is enabled in both your PayPal app and this plugin setting, the Apple Pay button will appear in the sections you've configured. Make sure you have uploaded your domain association file and registered your domain in your PayPal business account.
Default: Disabled
Title
This is the title of the payment gateway which appears on the checkout page. Customers will see this text when selecting their payment method. The title appears in the payment method selection area and helps customers identify the Apple Pay option.
You can customize this to match your store's branding or to make it clearer to customers. For example, you might use "Pay with Apple Pay" or simply "Apple Pay" depending on your preference.
Default: Apple Pay
Description
This is the description that appears when the payment gateway is selected on the checkout page. The description provides additional context or instructions to customers who select Apple Pay.
You can use this field to explain any specific details about using Apple Pay on your site, mention any special offers for Apple Pay users, or provide reassurance about security. Leave it blank if you don't need additional text beyond the title.
Default: Empty
Transaction Type
This setting determines whether funds are captured immediately or authorized for later capture.
Options:
- Capture: Funds will be captured immediately during checkout. The money is taken from the customer's account right away and transferred to your PayPal balance. This is the standard approach for most merchants selling physical or digital goods that ship immediately.
- Authorize: Authorized transactions put a hold on the customer's funds but no payment is taken until the charge is captured. The authorization reserves the funds in the customer's account without actually transferring them to you. Authorized charges can be captured on the Admin Order page when you're ready to fulfill the order.
Authorization is useful for pre-orders, custom products, or situations where you want to verify inventory or customer details before capturing payment. Keep in mind that PayPal authorizations expire after 29 days, so you'll need to capture within that timeframe.
Default: Capture
Authorized Order Status
If the transaction is authorized, this is the status applied to the order. This setting only appears when Transaction Type is set to Authorize.
Options:
- Pending payment: Order is awaiting payment confirmation
- Processing: Order is being prepared for shipment
- On hold: Order is on hold pending further action
- Completed: Order has been completed
- Cancelled: Order has been cancelled
- Refunded: Order has been refunded
- Failed: Order payment has failed
Most merchants use "On hold" for authorized orders since the funds haven't been captured yet. This prevents the order from moving through your fulfillment process until you manually capture the payment. Once captured, the order status will update according to your WooCommerce settings.
Default: On hold
Display Name
Display name for your store shown in the Apple Pay wallet. This is the name customers see in their Apple Pay interface when they're completing the payment. It should match your store name or business name so customers can easily identify the transaction.
This helps build trust and reduces confusion when customers review their Apple Pay transactions. Use your official business name or the name customers would recognize from your branding.
Default: Empty
Button Text
The text for the Place Order button when Apple Pay is selected. Leave blank to use the default WooCommerce text.
This setting allows you to customize what the checkout button says when a customer has selected Apple Pay as their payment method. For example, you might change it to "Complete Apple Pay Purchase" or "Pay with Apple Pay Now" to make the action clearer.
If left blank, WooCommerce will use its default button text, which is typically "Place order."
Default: Empty (uses WooCommerce default)
Apple Pay Payment Sections
These are the sections that the Apple Pay payment button will appear. If Apple Pay is enabled, the button will show on the checkout page by default. You can select multiple locations to give customers convenient access to Apple Pay throughout their shopping experience.
Options:
- Checkout Page: Shows Apple Pay on the main checkout page
- Product Page: Displays Apple Pay button on individual product pages for direct purchase
- Cart Page: Shows Apple Pay button on the cart page
- Minicart: Displays Apple Pay in the minicart/cart widget
- Express Checkout: Enables Apple Pay for express checkout flows
- Order Pay: Shows Apple Pay on the order pay page (when customers need to pay for an existing order)
The more locations you enable, the more opportunities customers have to use Apple Pay. However, consider your store's design and user experience when deciding where to display the buttons. Product page buttons work well for single-item purchases, while cart page buttons are better for customers who want to review multiple items before checking out.
Default: Cart, Checkout, Order Pay
Payment Method Format
This option controls how the Apple Pay payment method appears on the frontend. It determines how the saved payment method is displayed in customer accounts and during checkout when customers have saved their Apple Pay details.
Options: Various format options are available (the specific formats are determined by the payment method token instance). These typically include different ways of displaying the card type and last four digits, such as "Apple Pay ending in 1234" or "Apple Pay - Visa ****1234".
Choose a format that clearly identifies the payment method while maintaining a professional appearance in your checkout flow.
Default: type_ending_in
Checkout Page Button Placement
You can choose to render the Apple Pay button in either the payment method section of the checkout page or where the Place Order button is rendered.
Options:
- Place Order Button: The Apple Pay button replaces or appears alongside the Place Order button. This creates a more prominent call-to-action and makes Apple Pay feel like a primary payment option.
- In payment gateway section: The Apple Pay button appears in the payment methods selection area with other payment options. This groups it with your other payment gateways and keeps the traditional checkout flow.
The Place Order Button placement typically provides higher visibility and can increase Apple Pay usage. The payment gateway section placement maintains a more traditional checkout layout where customers select a payment method first, then proceed to place the order.
Default: Place Order Button
3D Secure Options
These settings control how 3D Secure (3DS) authentication is handled for Apple Pay transactions. 3D Secure adds an extra layer of security by requiring customers to verify their identity during payment.
Enable 3DS
When enabled, 3DS will be triggered when required. The system will automatically initiate 3D Secure authentication when PayPal's risk assessment determines it's necessary. This provides fraud protection while minimizing friction for low-risk transactions.
Keeping this enabled is recommended as it helps protect against fraudulent transactions and can help with liability shift for chargebacks. When 3DS is required but not enabled, some transactions may be declined.
Default: Enabled
Force 3DS
When enabled, 3DS is forced for all transactions when supported. Instead of letting PayPal decide when to require 3D Secure, this setting requires it for every transaction that supports it.
Forcing 3DS provides maximum security but may add friction to the checkout process since every customer will need to complete the additional authentication step. This is useful for high-risk merchants or industries where fraud prevention is critical. However, it may reduce conversion rates since some customers abandon checkout when faced with additional verification steps.
This setting only appears when Enable 3DS is turned on.
Default: Disabled
Button Options
These settings control the visual appearance of the Apple Pay button throughout your site.
Button Color
The style of the Apple Pay button.
Options:
- Black: Black button with white Apple Pay logo
- White: White button with black Apple Pay logo (solid background)
- White Outline: White button with black Apple Pay logo and border outline
Choose a color that provides good contrast with your site's design and maintains Apple's branding guidelines. Black buttons work well on light backgrounds, while white buttons suit dark backgrounds. The white outline option provides flexibility for various background colors.
Default: Black
Button Type
The type/text of the Apple Pay button. This determines what text appears on or alongside the Apple Pay logo.
Options:
- Standard Button: Plain Apple Pay button with just the logo
- Buy with Apple Pay: Shows "Buy with Apple Pay" text
- Checkout with Apple Pay: Shows "Checkout with Apple Pay" text
The button type affects how explicit the call-to-action is. The standard button with just the logo is cleaner and more minimal, while the text options make it clearer what will happen when customers click the button. Use text buttons if you find customers don't recognize the Apple Pay logo alone.
Default: Standard Button
Button Height
The height of the Apple Pay button in pixels. You can set the button height between 25 and 55 pixels to match your site's design and ensure the button is appropriately sized for its context.
Taller buttons are more prominent and easier to click, especially on mobile devices. Shorter buttons work better in compact layouts or when you want the button to blend with other elements. Consider the button's placement when choosing the height - product page buttons might benefit from being larger, while minicart buttons might need to be more compact.
Default: 40 pixels
Button Radius
The border radius of the button in pixels. Must be a non-negative integer. This controls how rounded the button corners are.
A higher number creates more rounded corners, while 0 creates sharp square corners. Apple's design guidelines typically use subtle rounding (4-5 pixels), but you can adjust this to match your site's overall design aesthetic. More rounded buttons (8+ pixels) have a softer, friendlier appearance, while sharp corners (0-2 pixels) look more modern and clean.
Default: 4 pixels